Set camera mode to [Video] and [A+]


Set Lens AF to [On] and Lens Stabilizer to [On]

Movie Recording Tab 1, Set High Frame Rate to [On] and Movie rec. Size to [FHD 179.8fps Standard (IPB)]

Movie Recording Tab 3, select [IS Mode] and set Digital IS to [Enhanced]


AF Tab 1, set Movie Servo AF to [Enable]

Network Tab 2, set Wi-Fi settings to [Disable] and Bluetooth settings to [Disable]


Settings Tab 1, set Auto Rotate to [On] and Add Movie Rotate Info to [Enable]


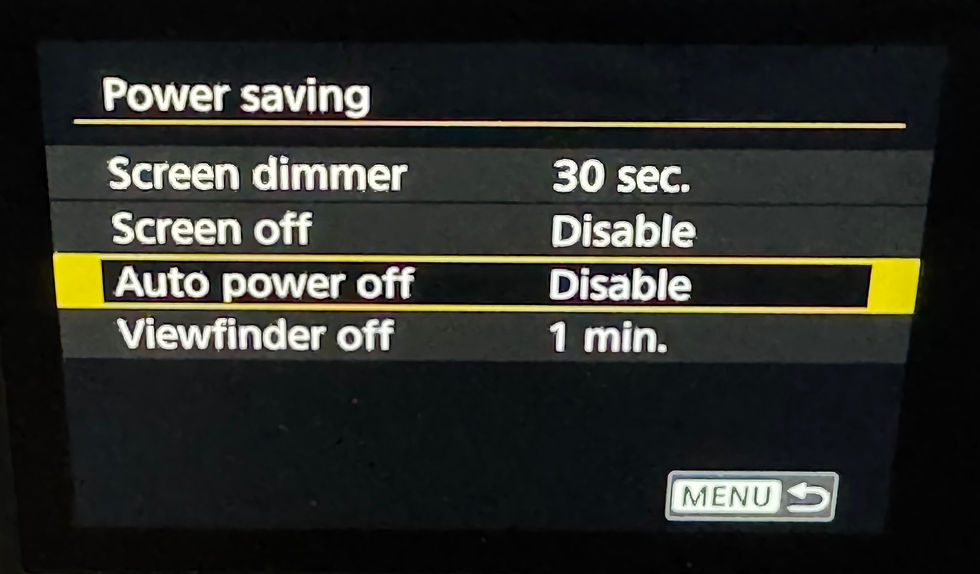
Settings Tab 3, set power saving auto power off to [Disable]
Settings Tab 4, set Choose USB connection app to [Photo Import/Remote Control]


Attach the camera to the Glambot® using the Universal DSLR Mount. See here for instructions on installing the universal mount.
If using a power adapter, plug the USB-C into the Power Port on the Glambot®
Connect the Coiled USB-C to USB-C cable into the camera data port and the Glambot® data port
Connect the iPhone/iPad into the Glambot data port and turn the camera on
Open Snappic and Select your event
Tap [Select Accessories] and choose [Volume Buttons]

Tap [Configure Camera] and select [EOS R8] *note: it doesn’t matter which EOS R8 selection you choose, they will all work the same.

Tap [Start Photo Booth] and tap the Live Preview Rotation left arrow once if filming portrait, then tap [Start Booth]

You’re Glambot® is now ready to begin filming!